Run MLflow on Coiled#
This example lets you run an MLFlow server on Coiled, alongside your model training. Data is persisted across jobs using Coiled filestores.
Requirements#
For this example, you’ll need these requirements.
pip install coiled mlflow pytorch torchvision torchmetrics 'protobuf<6.0.0'
Running MLflow as a Sidecar#
MLflow runs as a sidecar on the scheduler. Sidecars let you run containers on the scheduler or the workers. This example also takes advantage of filestores to persist the data across runs. The most straightforward way to specify the sidecar specification is a file on disk. Here’s the content of mlflow-sidecar.yaml:
mlflow:
  image: astral/uv:debian-slim
  command: >-
    uvx --python 3.13 mlflow server --host 0.0.0.0 --port 5000
    --backend-store-uri file:///scratch/filestores/mlflow
  ports:
    - 5000
  filestores:
    - name: mlflow
Like in the marimo blog post, we use a small uv image and uvx to run MLFlow. The command defines what to run on the container. We use extra arguments to mlflow to:
Set the host to accept connections from other machines,
Serve on port 5000 and expose it on the scheduler using the
portslist, andStore the MLflow data in
file:///scratch/filestores/mlflow, which is where Coiled attaches filestores. Themlflowname in the path must match the filestorenamespecified in thefilestoreslist. We use a named filestore to persist data across clusters.
You could also use a pre-existing MLflow Docker image instead of uv.
Training Code#
The code trains a straightforward PyTorch classifier on the FashionMNIST dataset.
Here’s the complete train.py script:
# COILED env MLFLOW_TRACKING_URI=http://coiled-scheduler:5000
# COILED env MLFLOW_TRACKING_USERNAME=alex
# COILED gpu true
# COILED map-over-values 0.1, 0.05, 0.01


import os

import torch
import torch.nn.functional as F
from torch import nn
from torch.utils.data import DataLoader
from torchmetrics import Accuracy
from torchvision import datasets
from torchvision.transforms import ToTensor


def get_data():
    """Create training data loader"""
    training_data = datasets.FashionMNIST(
        root="./data",
        train=True,
        download=True,
        transform=ToTensor(),
    )

    return DataLoader(training_data, batch_size=256, shuffle=True)


class NeuralNetwork(nn.Module):
    def __init__(self):
        super(NeuralNetwork, self).__init__()
        self.conv1 = nn.Conv2d(1, 1024, 5)
        self.pool = nn.MaxPool2d(2, 2)
        self.conv2 = nn.Conv2d(1024, 16, 5)
        self.fc1 = nn.Linear(16 * 4 * 4, 120)
        self.fc2 = nn.Linear(120, 84)
        self.fc3 = nn.Linear(84, 10)

    def forward(self, x):
        x = self.pool(F.relu(self.conv1(x)))
        x = self.pool(F.relu(self.conv2(x)))
        x = x.view(-1, 16 * 4 * 4)
        x = F.relu(self.fc1(x))
        x = F.relu(self.fc2(x))
        x = self.fc3(x)
        return x


def train(learning_rate):
    import mlflow
    import mlflow.pytorch

    # Select what hardware to use
    if torch.cuda.is_available():
        device = torch.device("cuda:0")  # NVIDIA GPU
    elif torch.backends.mps.is_available():
        device = torch.device("mps")  # Apple Silicon GPU
    else:
        device = torch.device("cpu")  # CPU
    print(f"Using {device} for training")

    # Set the experiment we're running
    mlflow.set_experiment("pytorch-train")

    with mlflow.start_run():
        # Cross-reference the Coiled cluster information
        mlflow.set_tag("coiled_cluster_id", os.environ.get("COILED_CLUSTER_ID"))
        mlflow.set_tag(
            "coiled_cluster_url",
            f"https://cloud.coiled.io/clusters/{os.environ.get("COILED_CLUSTER_ID")}",
        )

        epochs = 10
        loss_fn = nn.CrossEntropyLoss()
        metric_fn = Accuracy(task="multiclass", num_classes=10).to(device)
        model = NeuralNetwork().to(device)
        optimizer = torch.optim.SGD(model.parameters(), lr=learning_rate)

        train_dataloader = get_data()

        # Log training parameters
        params = {
            "epochs": epochs,
            "learning_rate": learning_rate,
            "batch_size": train_dataloader.batch_size,
            "loss_function": str(loss_fn),
            "metric_function": str(metric_fn),
            "optimizer": "SGD",
            "device": str(device),
        }
        mlflow.log_params(params)

        for epoch in range(epochs):
            print(f"Epoch {epoch + 1}")
            model.train()
            for batch, (X, y) in enumerate(train_dataloader):
                X, y = X.to(device), y.to(device)

                pred = model(X)
                loss = loss_fn(pred, y)
                accuracy = metric_fn(pred, y)

                loss.backward()
                optimizer.step()
                optimizer.zero_grad()

                if batch % 10 == 0:
                    # Log metrics during training
                    mlflow.log_metric("loss", f"{loss:3f}", step=batch // 10)
                    mlflow.log_metric("accuracy", f"{accuracy:3f}", step=batch // 10)
                    print(
                        f"loss: {loss:3f} accuracy: {accuracy:3f} "
                        f"[{batch}/{len(train_dataloader)}]"
                    )

        # Save trained model
        mlflow.pytorch.log_model(model, "model")

        return loss.item()


if __name__ == "__main__":
    import os
    import sys

    loss_val = float(sys.argv[1])
    print(
        f"MLFLOW_TRACKING_URI: {os.environ['MLFLOW_TRACKING_URI']}, loss_val: {loss_val}"
    )
    results = train(loss_val)
    print(f"Result: {results}")
At the top of the file, we add # COILED comments that will be picked up by coiled batch run, but ignored by the Python interpreter. That way, we can execute the script locally and on the cloud. The comments specify:
MLFLOW_TRACKING_URI: The MLflow server is available to the workers athttp://coiled-scheduler:5000, a URL that points to the scheduler where the MLflow server is running.MLFLOW_TRACKING_USERNAME: The username to use for the MLflow server. This is optional, but it’s a good practice to set it to the username of the user running the training.gpu true: To request a GPU machine. We could also request a specific VM type with something likevm-type g5.xlarge.map-over-values: Is the list of learning rates to train the model with. Coiled will launch a VM for each value in the list, unless we specifymax-workersto limit the number of workers.
In addition to the logging the typical metrics, we set two Coiled-specific tags after starting a run: the cluster ID and cluster dashboard URL. That way, we can later refer to the code that trained each model:
cluster_id = os.environ.get("COILED_CLUSTER_ID")
mlflow.set_tag("coiled_cluster_id", cluster_id)
mlflow.set_tag(
    "coiled_cluster_url",
    f"https://cloud.coiled.io/clusters/{cluster_id}"
)
Finally, we set up the script to accept the loss value as an argument, so we can train the model locally and on the cloud without modifying the code. We can launch the training locally by running:
python train.py 0.01
Launching the Cluster & Monitoring#
To launch the cluster and train the model, we use coiled batch run:
coiled batch run --scheduler-sidecar-spec mlflow-sidecar.yaml \
    -- train.py \$COILED_BATCH_TASK_INPUT
The $COILED_BATCH_TASK_INPUT is the input value for the current batch job, which is one of the learning rates specified in the map-over-values argument.
While the cluster is running, you can monitor the training by opening the MLFlow dashboard running on the scheduler. The simplest way to access is to click the “mlflow” button on the cluster’s detail page at the URL provided by coiled batch run.
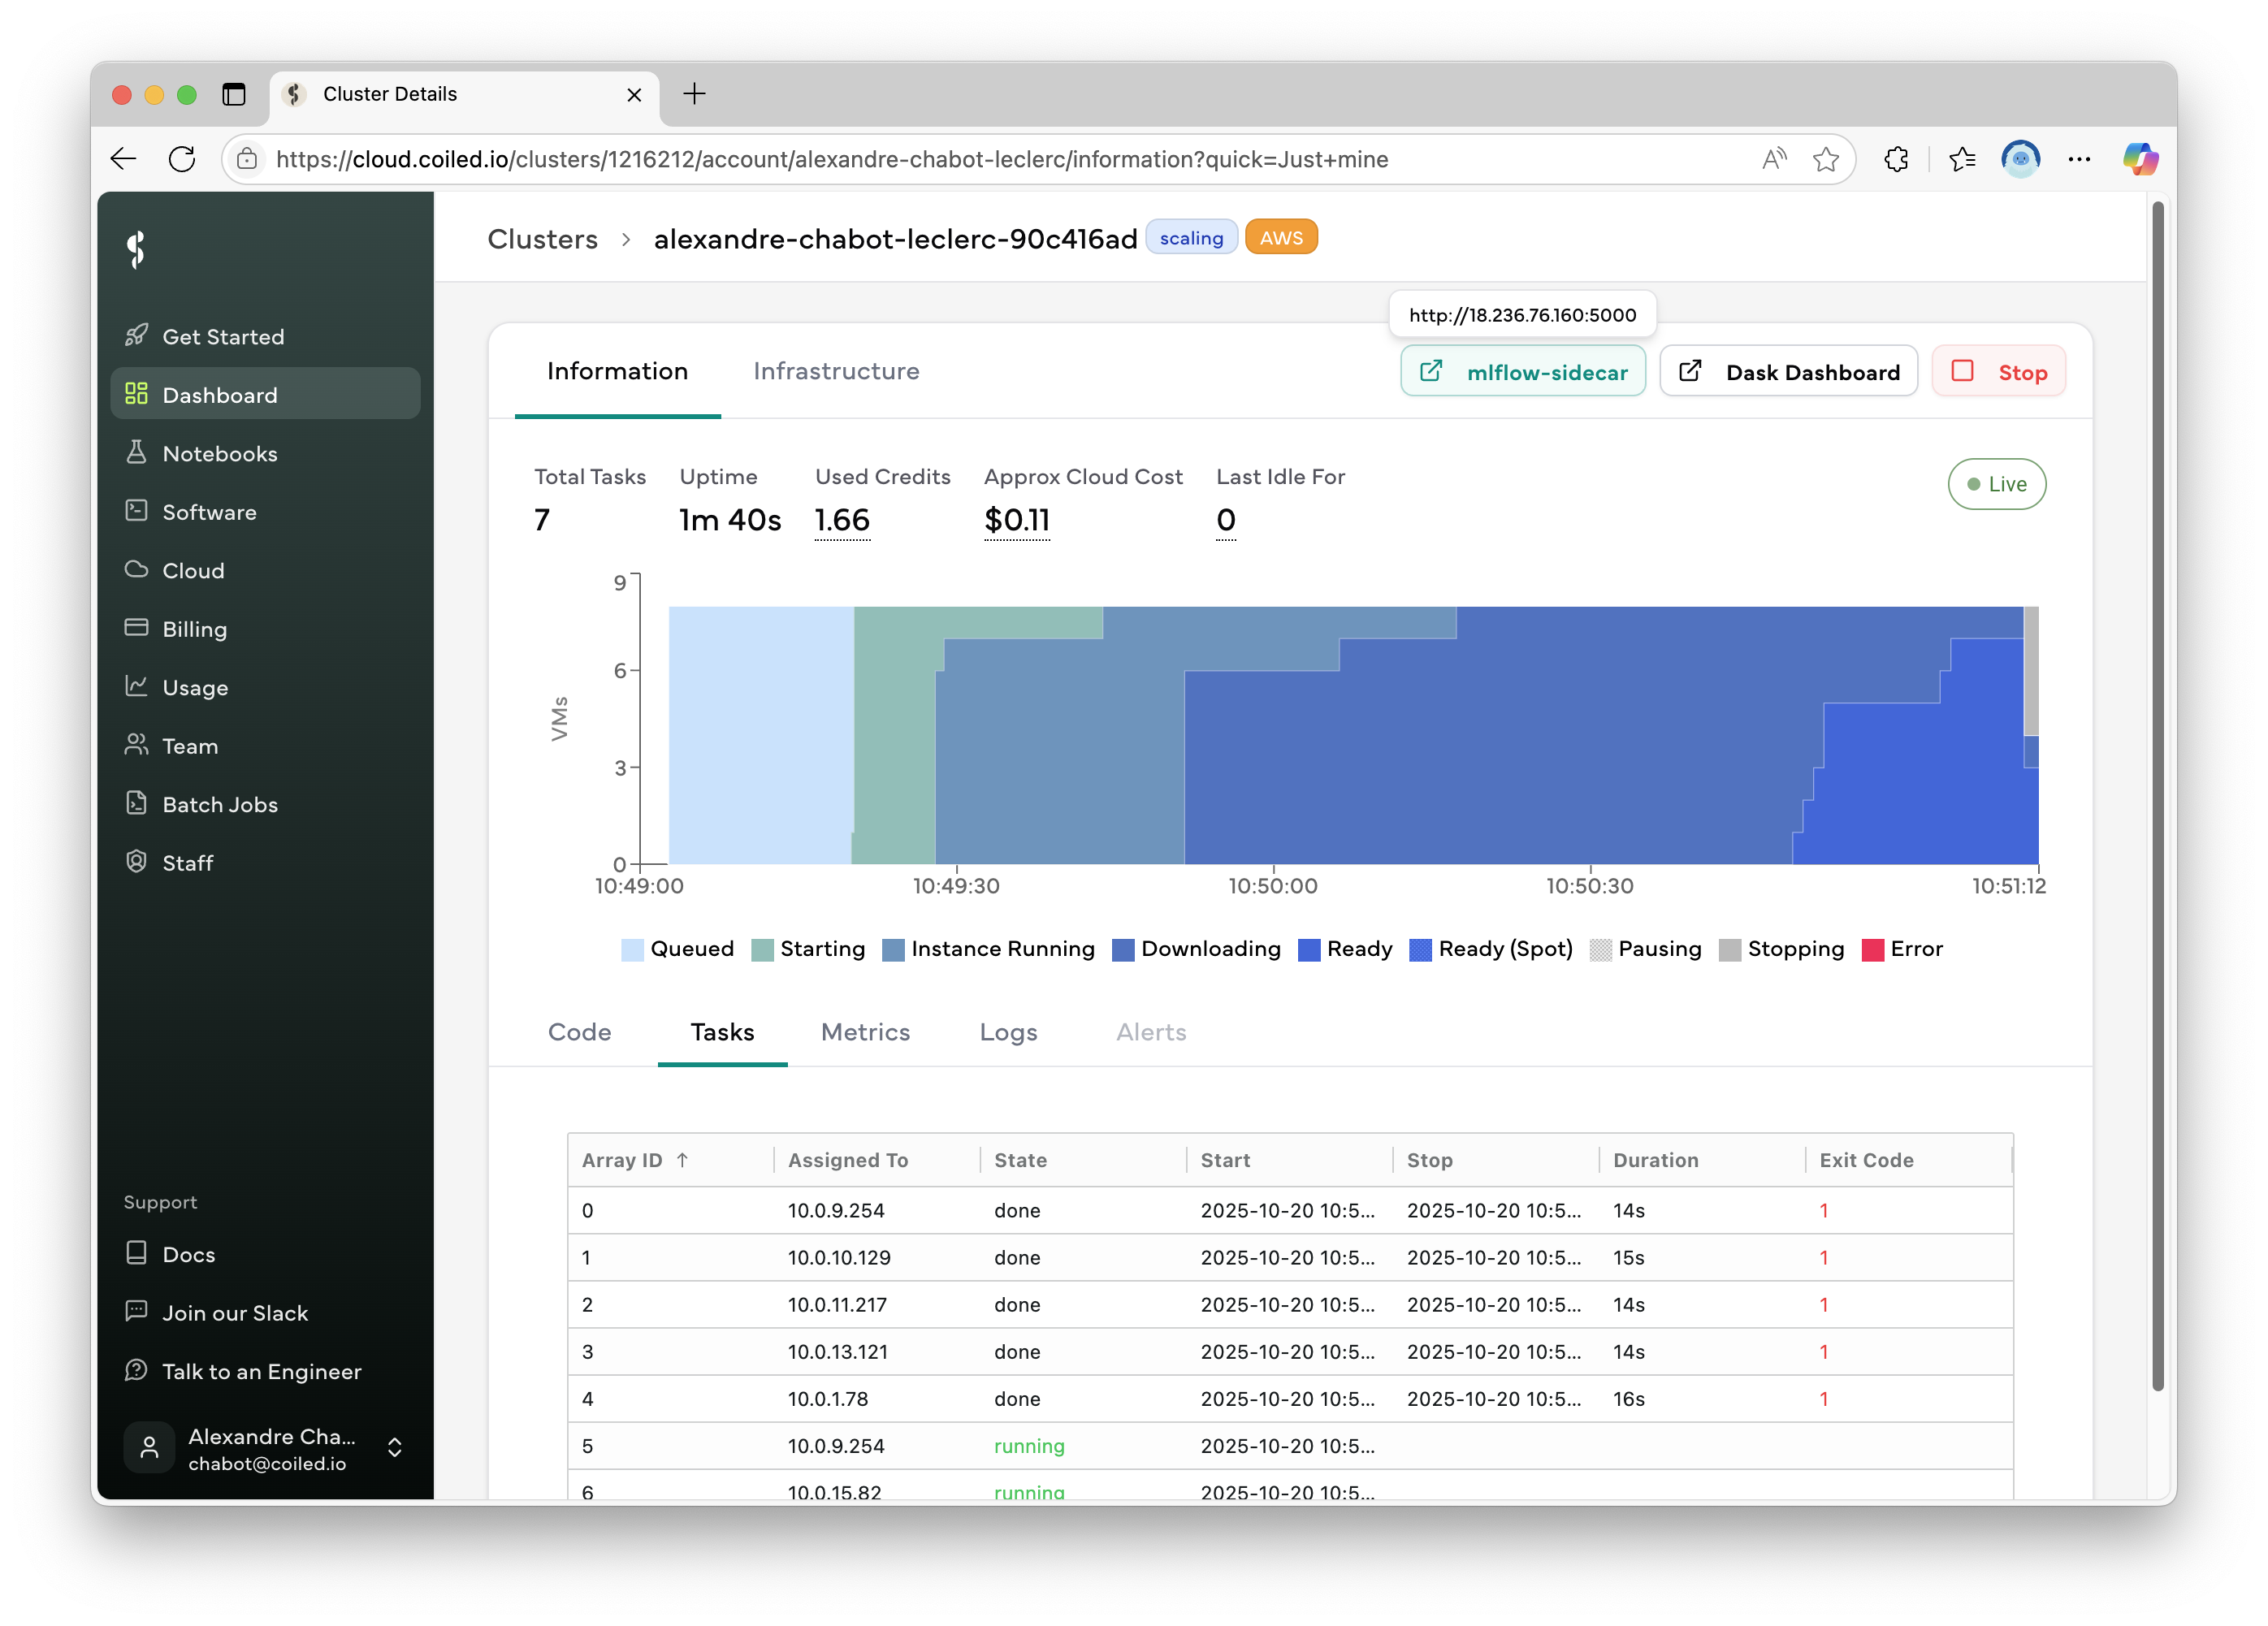
The cluster dashboard shows a button to open the sidedcar app when ports are opened on the sidecar spec.#
We can see the three batch jobs running in parallel, each training a different model.
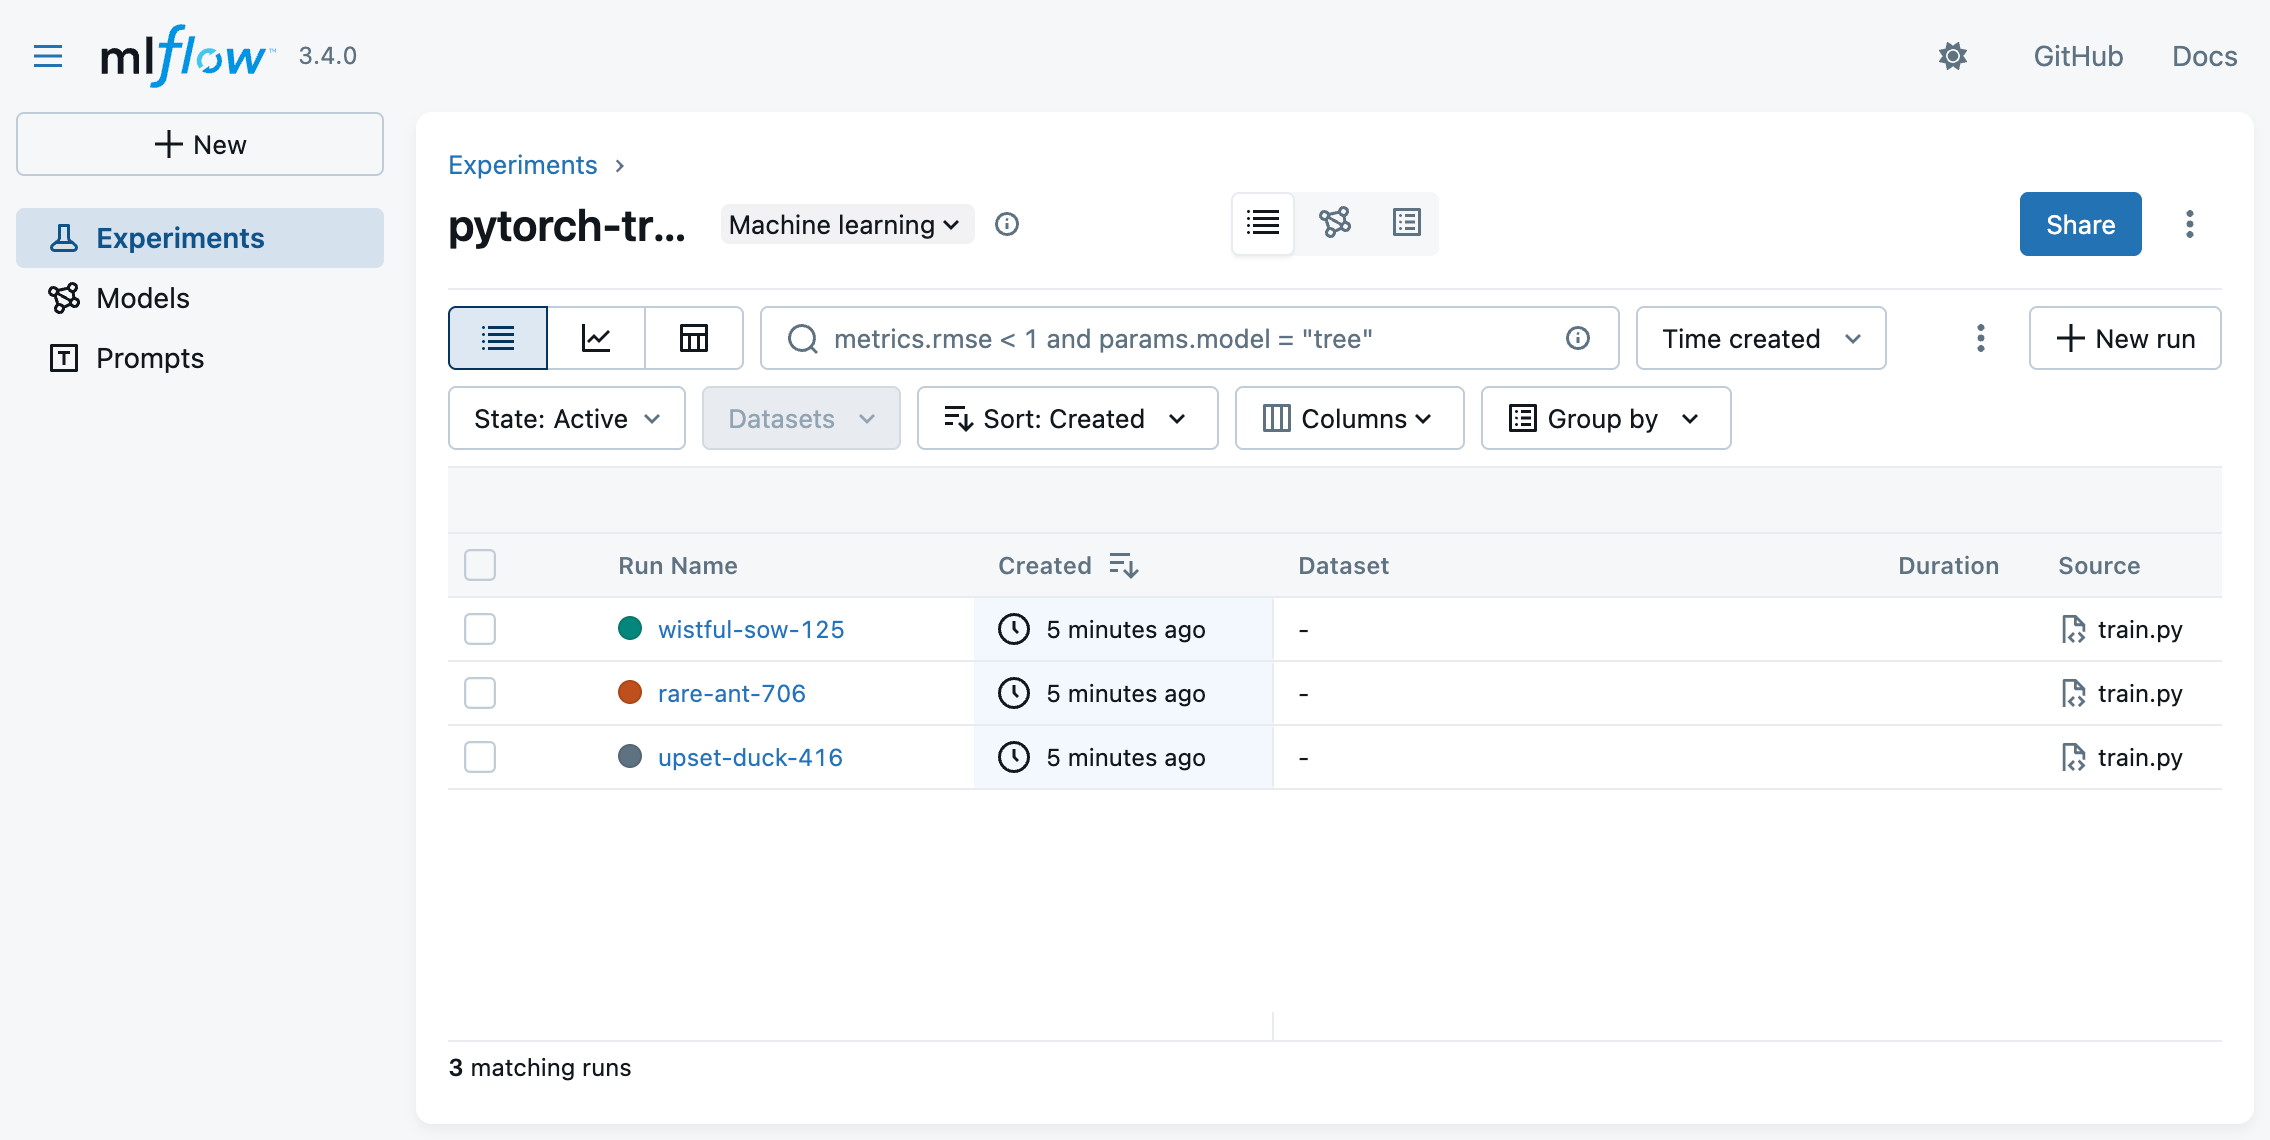
The MLFlow application shows the three experiments running in parallel.#
Once the cluster has stopped, you can browse the experiment data locally.
Browsing Experiment Data Locally#
To browse the experiment data locally, you need to download the filestore data to your computer with coiled file download:
coiled file download --into mlflow-data
By default, coiled file download will download the content of all the filestores associated with the most recent cluster into the current directory. Here, we request to put the data in the mlflow-data directory.
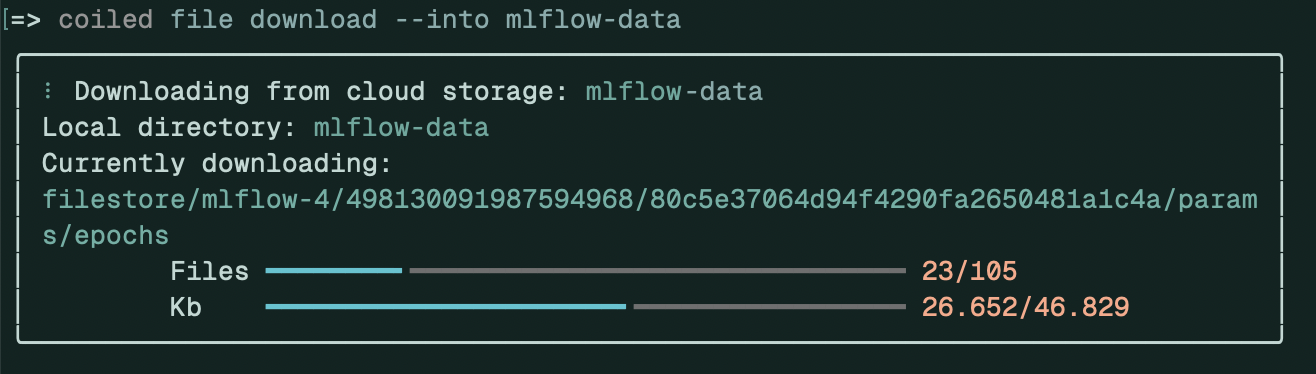
The filestore data is downloaded to the local machine.#
Then, you can start the local MLFlow server to browse the experiment data:
mlflow server \
    --backend-store-uri mlflow-data \
    --artifacts-destination mlflow-data
And browse the data at http://localhost:5000.
Browsing Experiment Data Remotely#
To browse the experiment data without downloading it to your computer, you must launch a cluster with the filestore attached. The simplest way to do this is to use coiled run:
coiled run --container astral/uv:debian-slim -it --port 5000\
    --filestore mlflow-data \
    -- uvx --python 3.13 mlflow server --host 0.0.0.0 --port 5000 \
        --backend-store-uri file:///scratch/filestores/mlflow-data
The -it flag opens an interactive session, so the cluster stays running as long as your terminal session is active. We attached the filestore we used previously to store the metadata and models, and launch the MLflow server.
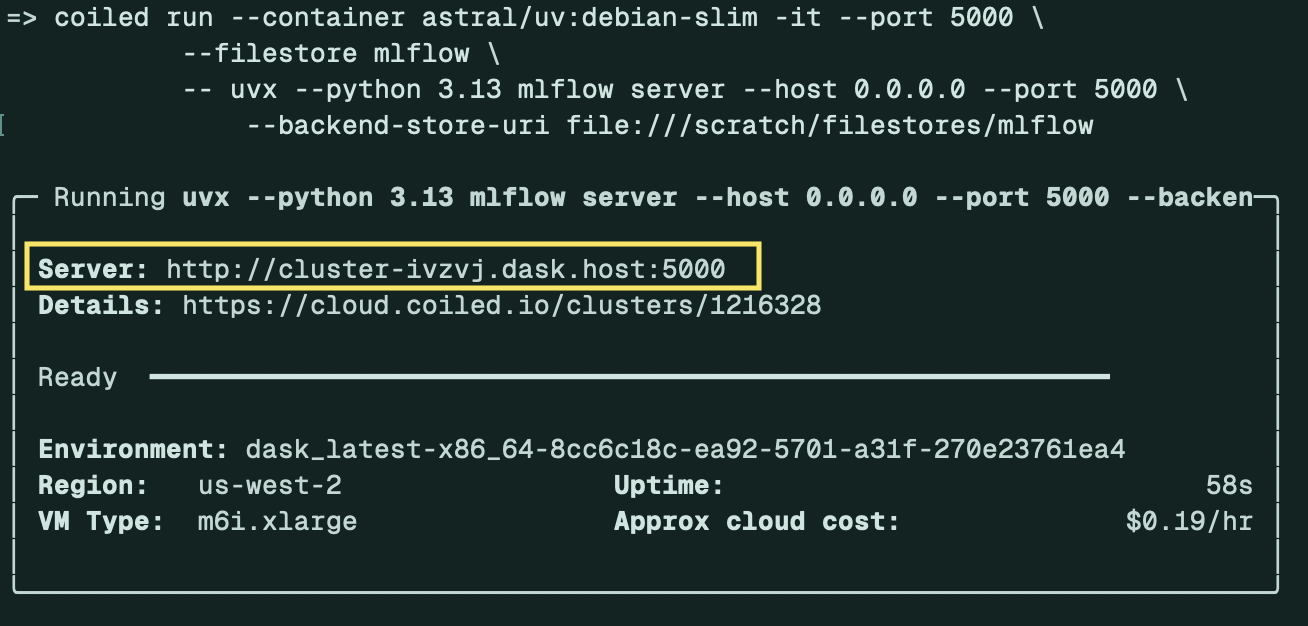
The output of coiled run shows the IP address of the cluster where MLflow is running.#
Once the cluster is running, you can browse the data with at the URL displayed in the terminal output.
Splitting Metadata and Model Storage#
Because models can be large, you might prefer to store them in a different filestore than the metadata. That way, it’s possible only to download the meta locally to navigate experiments with MLflow. Use the --default-artifact-root argument to mlflow and a second named filestore to specify where to store models:
mlflow:
  image: astral/uv:debian-slim
  command: >-
    uvx --python 3.13 mlflow server --host 0.0.0.0 --port 5000
    --backend-store-uri file:///scratch/filestores/mlflow-meta
    --default-artifact-root file:///scratch/filestores/mlflow-models
  ports:
    - 5000
  filestores:
    - name: mlflow-meta
    - name: mlflow-models
Then, to download only the metadata, use the --filestore argument to specify the name of the filestore containing the metadata:
coiled file download --filestore mlflow-meta --into mlflow-data
And browse the data with:
mlflow server --backend-store-uri mlflow-data
To also download the model data, omit the filestore name from the coiled file download command:
coiled file download --into mlflow-data
The content of both filestores will be merged into the same directory structure. This isn’t an issue for MLflow because experiments and models are stored in directories with globally unique IDs.
To serve the data, specify --artifacts-destination to mlflow to ensure MLflow finds the model data on your own machine:
mlflow server \
    --backend-store-uri mlflow-data \
    --artifacts-destination mlflow-data